Archive | October, 2010

My Obsession with Aux Vivres’ Dragon Bowl Sauce

19 Oct

by Marsha Taichman

If you know me, and we eat together at a restaurant  more than once, we will probably go to
Aux Vivres (4631 St. Laurent Boulevard in Montreal) if I have my way. This is the sad truth for my friends (all three of them). As far as I am concerned, everything there is tasty and nothing hurts my stomach because there is no dairy to be found anywhere, and I am lactose- intolerant. The restaurant/cafe serves fresh and often organic foods and is a proudly vegan institution. The food is so delicious there is no need to apologize for its meatless-ness or mimic meat and dairy, but they do have a lot of foods that feature creams made from tofu or nuts, and tempeh bacon and tofu scrambles are popular items on their weekend brunch menu. My boyfriend and favourite dining companion, Henry, pictured below, always gets the BLT on chapatti bread, which is composed of lettuce, tomato and smoked coconut with a white spread that is reminiscent of good old mayonnaise.

Henry

Henry and his BLT on chapatti bread

The sandwich is smoky, salty deliciousness. Every week there are specials that showcase seasonal items, and recently they had a beet latke plate and sweet potato burritos.

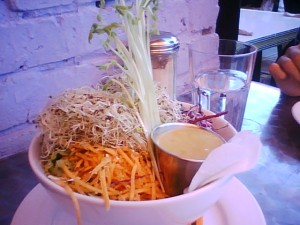
I order the same thing every time I go to Aux Vivres, which is the Dragon Bowl. Just typing “the same thing every time” makes me feel a little, how do you say, boring. In my defense, I have ordered other dishes there, thoroughly enjoyed them, and then pined for the Dragon Bowl all the way home. It is a bowl of organic brown rice topped with piles of fresh vegetables: spiraled beets, shredded carrots, chopped lettuce, two kinds of sprouts, and daikon radish. This mound of goodness is sprinkled with gomashio (unhulled black and white sesame seeds and salt) and is served with Dragon Bowl sauce, which is liquid gold.

dragon bowl

dragon bowl

I eat the vegetables and rice in the Dragon Bowl because they are a vehicle for said sauce. You can purchase it bottled at Aux Vivres, but then you have to cut up all the vegetables and cook the rice and I figure I will never be able to do it as well as they do (I have yet to invest in a mandolin for that perfectly thin daikon slicing), so I am happy to pay about ten dollars to feel like someone is looking after me for an hour or so.

Recently, my friend Lorie pointed me to a recipe for Dragon Bowl sauce written by the talented jae steele, who used to make Aux Vivres’ desserts. Her sauce calls for:

1/4 cup nutritional yeast
3 tbsp grapeseed or olive oil
2 tbsp. maple syrup
2 tbsp. tamari soy sauce
2 tbsp. filtered water
1 large or 2 medium cloves garlic

Blend all ingredients with a hand blender, or in a blender or food processor. Makes enough sauce for 3 Dragon Bowls. Store any leftovers in a sealed glass jar in the fridge for up to 1 week.

This version is good, but not as good as the one I long for when it’s been a while since my last fix. Maybe that has something to do with the fact that I used regular soy sauce rather than tamari soy sauce, and my olive oil might be a little off. Next time I will follow the recipe and maybe add a bit less than 2 tbsp. filtered water. But try it! Or just go to Aux Vivres and have a Dragon Bowl. You won’t be sorry. At least, I never am.

Check out Marsha’s bio on the Contributors page.

Top 10 travel eats (Italy, Spain, France, and back to Italy)

16 Oct

In August, I took a 3 week trip to Italy with a brief detour to Barcelona and Nice. For the first week of my trip, I spent time in my father’s hometown, a small seaside resort town on the Adriatic. The second week involved a cruise to Genoa, Nice, Barcelona, Majorca, and Sardinia). I then spent a week in Rome.

I ate a lot of food. Good food made with fresh ingredients. Despite all of this eating, my flying-home jeans were loose at the end of this extravaganza. We walked about 5 hours/day and I realized that lots of things I wanted to see are at the top of very large hills. So if you’re ready to walk, you can eat like Phelps. Also, I didn’t eat anything that came out of a package. Take note – the potato chip aisle in Italy is only 2 bags wide.

Here’s my top 10 in no particular order.

1. Quadrifoglio, Porto San Giorgio – this is one of many restaurants that are adjacent to the beach in this little resort town, my dad’s hometown. Nobody eats on the beach (hence no pesky seagulls!). You can spend the day on the beach, walk 20 feet to the restaurant for lunch and then return to the glorious shade of your beautiful beach umbrella and comfy chairs. (I’m not a tanner)


seafood pasta

seafood pasta


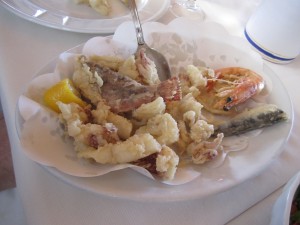
2.Vela, Porto San Giorgio – Another beach resto. You may notice it’s seafood again. Basically, every restaurant has the same menu. Some do it better than others. Vela is among the best.


fried seafood

frittura mista, Vela, Porto San Giorgio


3. Can’t remember the name of this resto, I swear. We had a 3-course meal on a park bench (which was probably very gauche). This was the dessert.


tiramisu

tiramisu, Genoa


4. Bar del Pla, Barcelona – Cod fritters are like little fishy pillows of joy. We grazed on tapas throughout the city. The food, staff, and atmosphere here was nice. The menu, like most things in Barcelona was well-designed.


cod fritters

cod fritters tapas, Bar del Pla, Barcelona


5. Nice, Porto San Giorgio, Rome – I ate these donut shaped peaches everywhere I could find them. They’re sweet and white inside and too expensive in North America (when you can find them).


saturn peaches

Saturn / Donut peaches, Rome


6. Filletti di Baccala, Rome – This restaurant does one thing, fried cod fillets. As a general tip, it’s a good idea to eat at restaurant that serves only one main dish especially if the name of the dish is also the name of the restaurant and the sign for the resto looks older than you.  Lotsa locals eating here.


fried cod

fried cod, Filetti di Baccala, Rome


7. Sora Marguerita, Rome – This was my third fried artichoke in 3 days and it was the best. The outside petals are crunchy like potato chips and the inside is soft.


fried artichokes

fried artichokes, Sora Margherita, Rome


8. Bakery in Nice, can’t rember the name of it. These little cookie sandwiches are so flavourful that you only need one. I will try anything bergamot flavoured. If the best Earl Grey tea in the world were a cookie, this would be it.


bergamote maccaron

bergamotte maccaron, Nice


9. Costanza, Rome – This gnocchi, mozzarella, basil dish was a bit of a surprise. I didn’t expect it to be so casserole-ish. Not the ideal dish for 30 C weather in Rome but so good I ate the whole thing (and then probably walked up a hill somewhere).


gnocchi

gnocchi, Costanza, Rome


10.  Roscioli, Rome – If you’re gonna have a plate of charcuterie or sample some regional or international cheeses, this is the place to do it. Don’t expect the service to be good, however.


mixed plates

mixed salami and cheese plates, Roscioli, Rome


That’s it  for this eating adventure. Eating in Italy really helped me understand my parent’s attitudes towards food. Attitudes that I have internalized. This trip has been in the works for a long time. Now I have to figure out how long it will be before I can get back there. I come away from this trip with a few thoughts. Most things you want to see in Europe are at the top of a hill. Walk up. Eat fresh and you will not gain weight – even if it’s deep fried. Use good ingredients – always. Eating or drinking while walking or commuting = bad ideas. Italians don’t do it and nor should you. Sit down and enjoy your meal with friends, family, and loved ones. I’m lucky and thankful.

And now for the librarian segment – A restaurant I didn’t eat at in Rome. The Library.


The Library restaurant sign

The Library restaurant in Rome


Happy Thanksgiving

10 Oct

We here at Digestive Librarians’ Digest are grateful for family, friends, FOOD and you, dear readers.

Thank you for sharing many meals with us through our first three months … and here’s to many more!

Happy harvest!

Can you can?

3 Oct

By Tara Thompson

You know canning food is not popular when you are in Real Canadian Superstore in mid-September and learn that all the canning supplies have been cleared to make room for Halloween candy. But never fear, I found my needed 250mL jars and proceed to continue our family tradition.

Canned tomatoes in the canner

I remember going to my Gran & Poppa’s house every fall to can peaches and pears. We would all, usually about 5-6 of us, sit around a card table set up in their kitchen and proceed to blanch, peel, cut, pack, and process about 30 jars. I even remember my Mom making pickles and relish when I was a kid. When I met my husband, we incorporated his family’s tradition of canning tomatoes, making tomato/vegetable sauce, and creating jams. Now each year is a little different depending on what is needed (tomatoes and peaches) and what recipes strike our fancy (pickles and pickled pears).

Canned pears and peaches

I think that besides the tradition of  “this is what is done in the fall”, I like that I know exactly what is in the jars. It’s similar to when we make stocks; I can’t figure out why there is so much sodium in store bought stock, as we never add salt to stock. This made me think of tomato juice. Whenever I’ve tried any of the store bought tomato juice, I’ve found it too salty; maybe next year I’ll try making my own.

Canning isn’t complicated, but there are a number of steps. To get started, some basic supplies are needed:

  1. Mason Jars (we like large mouth jars)
  2. Two-piece lids (sealing disc & rim)
  3. Large pot to prepare the recipe in
  4. Canner (to hold the jars… water must cover the jars)
  5. Accurate measuring spoons and cups

When you find a recipe, follow it precisely and make sure that it is a modern recipe, current with today’s health guidelines.

This year’s new discovery was Pickled Pears (with a few adjustments for our tastes):

1 large lemon
8-1/2 cups water, divided
12 medium ripened Autumn Star pears (with red skins)
1-1/4 cups white sugar
1/2 cup white vinegar
4 to 6 bay leaves (1 for each jar)
12 to 24 pink peppercorns (4 for each jar)
12 to 24 green peppercorns (4 for each jar)

Prepare the canner, jars, and lids for canning.

  • Start the water boiling in your canner (it takes longer than you think).
  • Sterilize the jars by either submersing them in boiling water or the rinse cycle of the dishwasher.
    Also while you finish working keep the jars warm to keep them sterilized.
  • Sterilize the lids by keeping them in a small pot of hot water to soften the seals. To prevent them from sticking together, put them in the water opposite each other: bottoms together, tops together.

Using a vegetable peeler, remove the lemon peel from the lemon in one continuous spiral. Cut vertically into pieces (1 for each jar) and set aside.

Squeeze the lemon juice into a large bowl and add 4 cups of water.

Peel, quarter, and core the pears, placing them in the lemon juice solution to prevent discolouration.

Place the sugar, vinegar, and remaining 4 1/2 cups water along with the reserved lemon peel in a large pot and bring to a boil.

Drain the pears and add them to the boiling syrup. Return to a boil and remove from the heat. The syrup should be a pink colour (from the skins).

In each sterilized Mason jar, place 1 piece of lemon peel, 1 bay leaf, 4 pink peppercorns, and 4 green peppercorns. Pack the pears into the jars to within 3/4” of the top of the rim of the jar (headspace). Remove any air trapped in the jars by sliding a rubber spatula down the sides of the jar. Fill with syrup, to the 3/4″ headspace.

Wipe the jar rim with a clean damp cloth. Centre the canning lid on the jar. Apply the screw band (rim) and tighten until just finger tip tight.

Place the jars in the canner and when the water is boiling time the process for 10 minutes. The water should cover the jars by at least 1”.

When 10 minutes is up, remove the lid from the canner and wait 5 minutes before removing the jars. Place the jars on a tea towel or wooden board. Let cool, undisturbed, for 24 hours. Check that the jars have sealed properly: sealed lids curve downward. Remove screw bands and store them separately (we don’t do this, but it is to prevent moisture and rust). Wipe jars clean, label and store them in a cool dark place until ready to serve.

Makes 3X500mL jars or 6X250mL jars.

    Adapted from “Picture Perfect Pickles: Pickled Pears.” Harrowsmith Country Life. October 2009 (No. 208) pg 86 (also available online through EBSCO’s MasterFILE Premier – check your library’s e-resources!).

    Other canning recipes are available in many places.  Two good books that I found are:

    Put ‘em Up!: A Comprehensive Home Preserving Guide for the Creative Cook from Drying and Freezing to Canning and Pickling by Sherri Brooks Vinton.

    You Can Can: A Guide to Canning, Preserving, and Pickling ed. Jan Miller

    Check out Tara’s bio on the Contributors page.